It’s always recommended to regularly update Windows as the updates solve any existing bugs and bring about new features.
Usually, users use the graphical interface on the OS to search for and install updates. However, there are some cases where you may want to run this process from the Command-line (CLI) tools such as Command Prompt and Windows PowerShell.
For instance, you may need to manage updates, especially for other users on a Windows server. Or, you may be creating a script where you need such commands.
How to Run Windows Update from Command Line?
There are a few ways to run Windows Update from the command line on a Windows system, which are as follows:
Using Command Prompt
On Windows 10 and 11, Microsoft uses the Update Session Orchestrator Client UsoClient.exe tool for updating your system components.
Previously, it was possible for users to use this program from the Command Prompt to check and install updates. However, in the latest versions, you can only check for updates. Regardless, you can try using the steps below and check if they work out for you:
- Open Run by pressing Win + R.
- Type
cmdand press Ctrl + Shift + Enter to open the Elevated Command Prompt.
- Enter the following commands depending on the corresponding operations:
UsoClient StartScan– Start the scan for available updatesUsoClient StartDownload– Download but not install the updates or patches you scanned for.UsoClient StartInstall– Install all downloaded updates.UsoClient ScanInstallWait– Scans, downloads, and installs the updatesUsoClient RestartDevice– Restarts your computer to complete the update installationUsoClient ResumeUpdate– Resumes the installation of update after rebootUsoClient RefreshSettings– Refresh the update settings to the default
You can also check which UsoClient commands you can use on your system by using the following command on the Elevated Windows PowerShell:
- Open Run.
- Type
powershelland press Ctrl + Shift + Enter to open the Elevated Windows PowerShell. - Copy and paste the following command and press Enter:
Get-ScheduledTask -TaskPath '\Microsoft\Windows\UpdateOrchestrator\' | Select-Object @{Expression={$_.TaskName};Label="TaskName"}, @{Expression={$_.Actions.Execute + ' ' + $_.Actions.Arguments};Label="CommandLine"}
On older Windows versions, you could use the Windows Update Agent WUAUCLT.exe to update Windows.
First, you need to enable Automatic Updates with scheduled installation through the Group Policy. Otherwise using the Windows Update Agent from Command Prompt won’t work. To do so,
- Open Run and enter
gpedit.mscto open the Local Group Policy Editor. - Go to Computer Configuration > Administrative Templates > Windows Components > Windows Update.
- If it doesn’t contain policies but expands to further folders, go to Manage end user experience.

- Double-click on Configure Automatic Updates.

- Check Enabled and set Configuring automatic updating to 4 – Auto download and schedule the install.
- You can choose any schedule you want. Then, click Apply and OK.

Then, you can use the following commands on Prompt to update Windows using the Update Agent:
wuauclt /detectnow– Scans for available updateswuauclt /updatenow– Installs the available updateswuauclt /detectnow /updatenow– Combines both the processes above
Microsoft didn’t exactly create the WUAUCLT.exe and UsoClient.exe tools for end users. So you won’t get any additional information for whether the commands are actually running when you use them on the Command Prompt. The Prompt will show that these commands have finished running even when they are still operating in the background.
You have to estimate the time it may take and wait until then. So, instead of this method, we recommend using Windows PowerShell as you can get more detailed information during the process.
Using PowerShell
Windows PowerShell is a very powerful Windows CLI with which you can do everything that Command Prompt allows and many more. Naturally, you can use it to run windows updates. Here’s what you need to do:
- Press Win + R to open Run.
- Type
powershelland press Ctrl + Shift + Enter to open the Elevated PowerShell. If you use PowerShell 7, you can open it by enteringpwshinstead ofpowershell - Enter the command below to download and install the Windows Update Module, which you need to run the actual commands for updating Windows:
Install-Module PSWindowsUpdate - On the prompts, type
Yand press Enter. - After installing it, enter the following update commands to perform the corresponding actions:
Get-WindowsUpdate– Scans for available updates and displays themInstall-WindowsUpdate– Downloads and installs all the available updatesGet-WindowsUpdate -AcceptAll -Install -AutoReboot– Downloads and installs all the available updates while automatically rebooting the PC after the installation if necessary.Get-WindowsUpdate -Install -KBArticleID 'KB5017859'– Install the KB5017859 update. You need to replace the update ID ‘KB5017859’ with the KB Article ID of the available updates from theGet-WindowsUpdatecommand.
Using Visual Basic Script
While the above command line methods can run Windows Update, they are not interactive and user-friendly. Microsoft’s platform contains some Visual Basic Script (VB script) to run an interactive update process from the CLI, especially as a sample for developers. However, you can also use this script for your purpose.
- Open Run and enter
notepadto launch this text editor. - Then, open a web browser and go to the following Microsoft pages depending on whether you want to install a particular update or all updates at once:
- Copy the script from the page to the notepad you just opened.
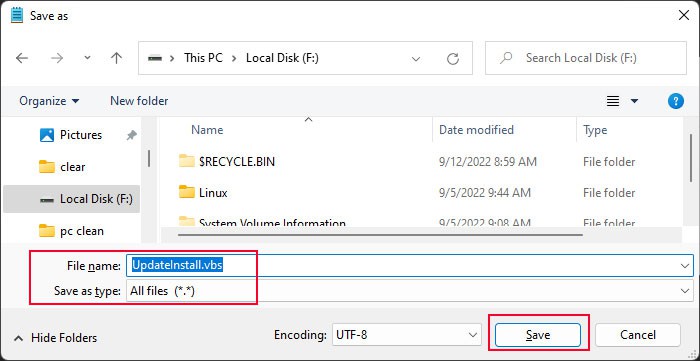
- Press Ctrl + S to save the file.
- Set Save as type to All files and File name to
UpdateInstall.vbs. You can use any name, but remember to use the.vbsextension. - Save it on any location by navigating there and clicking on Save.

- Then, open the Elevated Command Prompt.
- Enter the following command while replacing the path:
cscript “<Path to the folder>\UpdateInstall.vbs”
- You can also right-click on the script on your file explorer and select Copy as path. Then, paste it after typing
cscriptand the space to avoid manually typing the full path. - Then, follow the on-screen instructions on the CLI.

